A leaky faucet is more than just an annoyance—it wastes water and can increase your utility bills. In Saskatchewan, where water conservation matters and municipal rates continue to rise, a single dripping faucet can waste up to 11,000 litres annually, costing Regina and Saskatoon homeowners an extra $50-$100 per year. The good news is that fixing most leaky faucets is a simple DIY project that requires minimal tools and experience. Whether you're in Martensville, White City, or Pilot Butte, this guide will walk you through the repair process step-by-step.
Most faucet leaks stem from worn internal components—washers, O-rings, cartridges, or ceramic disc assemblies—that deteriorate over time. Saskatchewan's hard water, rich in calcium and magnesium, accelerates this wear by creating mineral deposits that corrode seals and scoring internal surfaces. The extreme temperature swings our province experiences (from -40°C winters to +35°C summers) also cause expansion and contraction in metal components, further shortening faucet lifespan. Understanding your faucet type and having the right replacement parts on hand makes this a 15-60 minute repair for most homeowners.
Before you begin, you need to identify which of the four common faucet types you have. This determines which replacement parts you'll need and the specific repair steps to follow:
If you're unsure which type you have, partially disassemble the handle (see Step 2 below) or check the manufacturer's model number, usually stamped on the faucet body under the sink. Take photos before disassembly—this helps during reassembly and when shopping for parts at Home Depot, Canadian Tire, or local plumbing suppliers in Regina or Saskatoon.
Gather these tools and materials before starting. Having everything ready prevents mid-repair trips to the hardware store:
Replacement parts typically cost $10-$50 for individual washers, O-rings, or cartridges at Saskatchewan retailers. Complete repair kits with cartridge and all seals run $20-$80. Always bring the old component to ensure an exact match—faucet parts vary significantly by manufacturer and model, and using the wrong size will result in continued leaking.
Locate the water shutoff valves under the sink—there should be two, one for hot water (typically on the left) and one for cold (right). Turn both valves clockwise until hand-tight. Don't force them; older valves can break if over-tightened. If the under-sink valves are stuck, corroded, or leaking themselves (common in Saskatchewan homes with original plumbing), you'll need to shut off water at the main valve, usually located near your water meter or where the service line enters your home.
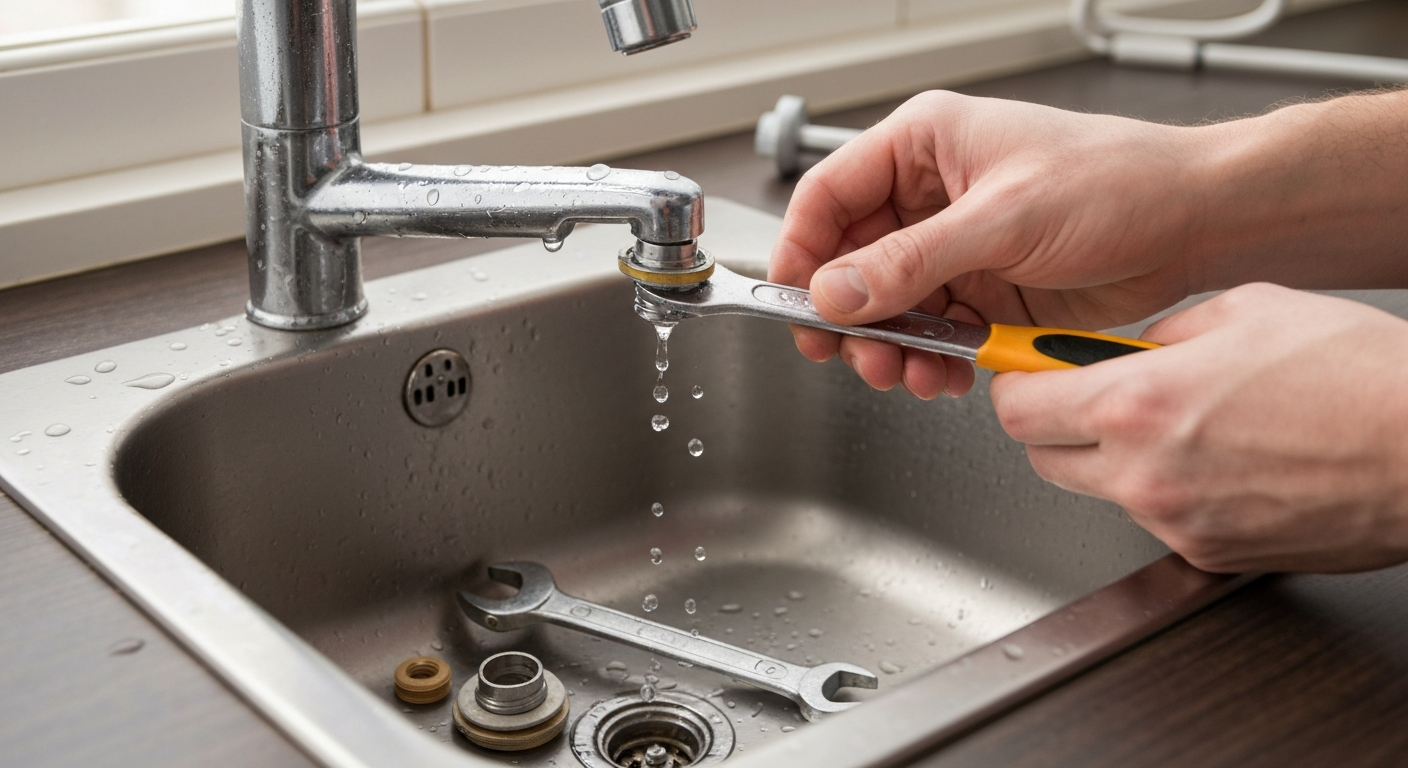
After closing the valves, turn on the faucet to drain any remaining water in the lines and relieve pressure. Leave the faucet in the open position throughout the repair. Place a rag in the sink drain to prevent small parts from falling down the pipe—losing a tiny retaining clip means an extra trip to the store.
Most faucet handles have a decorative cap or button covering the attachment screw. Use a flathead screwdriver to gently pry off this cap. Underneath, you'll find either a Phillips screw, a flathead screw, or an Allen screw recessed into the handle body. Remove this screw completely and set it aside in your parts container.
Pull the handle straight up and off the faucet body. If it's stuck due to mineral buildup (very common with Saskatchewan's hard water), gently wiggle it while pulling. Avoid using excessive force, which can crack plastic or chrome-plated handles. For stubborn handles, apply penetrating oil around the base, wait 10-15 minutes, then try again. You can also wrap the handle in a warm, damp cloth to help loosen mineral deposits.
With the handle removed, you'll see the internal mechanism. The next steps vary by faucet type:
For compression faucets: Use your adjustable wrench to loosen the packing nut (the large hexagonal nut visible after handle removal). Turn counterclockwise and lift out the entire valve stem assembly. The rubber washer will be at the bottom of the stem, held by a brass screw.
For ball faucets: Remove the cap and collar assembly using adjustable pliers. Underneath, you'll find the cam, cam washer, and rotating ball. Lift these out carefully, noting their orientation. The inlet seals and springs sit in the faucet body below.
For cartridge faucets: Look for a retaining nut (bonnet nut) or a U-shaped retaining clip at the top of the cartridge. Remove the clip with needle-nose pliers or unscrew the nut. Grip the cartridge stem with pliers and pull straight up. Cartridges can be very tight—wiggle gently while pulling. If it won't budge after applying penetrating oil, the cartridge may be permanently seized, requiring professional removal or complete faucet replacement.
For ceramic disc faucets: Remove the escutcheon cap (decorative cover) and the disc cylinder retaining screws. Lift out the entire cylinder assembly. The ceramic discs are inside this cylinder.
Examine all removed parts for wear, cracks, or mineral buildup. Saskatchewan's hard water leaves white, crusty calcium deposits that feel rough to the touch. Soak metal components in white vinegar for 15-30 minutes to dissolve these deposits, then scrub with an old toothbrush. Rinse thoroughly with clean water.
Check the valve seat (the opening inside the faucet body where the cartridge or stem sits) for scoring, pitting, or rough edges. Run your finger around the rim—it should feel smooth. A damaged valve seat will cause leaks even with new parts and requires either resurfacing with a valve seat wrench or complete faucet replacement.
Look for these specific wear indicators:
Install your new components, taking care to match the exact orientation of the originals:
Compression faucets: Remove the brass screw holding the old washer, replace with a new washer of identical size, and reinstall the screw. Replace the O-ring on the valve stem by rolling it off and rolling the new one on. Apply a thin coat of plumber's grease to both the washer and O-ring.
Ball faucets: Replace all inlet seals and springs (they're inexpensive and always included in repair kits). If the ball itself shows wear, replace the entire ball assembly. Install new O-rings on the spout, lubricating with plumber's grease.
Cartridge faucets: Coat the new cartridge's O-rings with plumber's grease. Insert the cartridge into the faucet body, ensuring proper alignment—most cartridges have a flat side or tab that must face a specific direction. If installed backwards, your hot and cold will be reversed. Push down firmly until the cartridge seats completely.
Ceramic disc faucets: Replace the neoprene seals in the cylinder. If the ceramic discs themselves are cracked or scored, replace the entire cylinder assembly (these aren't sold separately). Clean the cylinder seats thoroughly before reassembly.
Reverse the disassembly process, working carefully to avoid cross-threading nuts or over-tightening screws. Install retaining clips or nuts finger-tight first, then snug with tools—just until resistance is felt. Over-tightening cracks plastic components and can actually cause leaks by deforming O-rings.
Replace the handle, securing it with the original screw. Don't force the handle onto the stem; it should slide on easily. If it doesn't, the cartridge may not be fully seated or may be rotated incorrectly. Snap the decorative cap back into place.
Before declaring victory, test your repair thoroughly. Turn the under-sink shutoff valves back on slowly—opening them quickly can cause water hammer (a loud banging noise) that may damage pipes or loosen connections. Turn the faucet handle to the off position, then slowly open the valves completely.
Check for leaks around the base of the faucet, at the handle, and from the spout. Turn the water on and off several times, testing both hot and cold. Let water run for 2-3 minutes to flush any debris. If you notice dripping from the spout, the cartridge may need slight rotation or the packing nut may need minor tightening. If water leaks around the handle base, tighten the bonnet nut slightly or check that O-rings are properly seated.
Check under the sink while water is running to ensure the shutoff valves aren't leaking and that no connections have loosened during the repair. Wipe all surfaces dry and monitor for 24 hours to confirm the leak is completely resolved.
Understanding the financial implications helps you decide whether to tackle this yourself or call Hey Fix It Pro:
| Repair Type | DIY Cost | Professional Cost | Time Investment |
|---|---|---|---|
| Simple washer/O-ring replacement | $10-$25 (parts only) | $120-$250 | 15-30 minutes |
| Cartridge replacement | $20-$50 (parts only) | $150-$275 | 30-60 minutes |
| Complete faucet replacement | $150-$400 (faucet + supplies) | $300-$600 (parts + labor) | 2-4 hours |
| Emergency after-hours repair | N/A | $225-$450+ | Same day |
These costs reflect current Saskatchewan pricing for 2025. Professional repairs include labor at $75-$150 per hour in Saskatoon and Regina, plus a typical trip charge of $130-$225. While DIY saves money upfront, professional repairs come with warranties (typically 90 days to 1 year on labor) and ensure code compliance, which matters if you're planning to sell your home.
For homeowners completing multiple plumbing upgrades, remember that the Saskatchewan Home Renovation Tax Credit offers a 10.5% rebate on eligible expenses up to $4,000 (maximum $420 credit). While simple faucet repairs typically don't qualify, bundling this work with other renovations may make you eligible.
Saskatchewan has some of Canada's hardest water, with Regina and Saskatoon averaging 250-350 mg/L of dissolved minerals (versus the national average of 150 mg/L). This accelerates faucet component wear and creates stubborn mineral deposits that complicate repairs. When working on faucets in our province:
Saskatchewan's extreme climate affects when and how you should tackle faucet repairs:
Winter (-20°C to -40°C): Avoid shutting off water to unheated areas, as pipes can freeze within hours. If you must repair a faucet in an unheated garage or basement, keep a space heater running and leave cabinet doors open. Frozen pipes cost $250-$1,000+ to repair professionally and can cause thousands in water damage.
Spring thaw (March-April): The ideal time for plumbing projects. Temperatures are moderate, and you can identify winter damage before it worsens. This is when Hey Fix It Pro sees the highest volume of leak repair calls as freeze-thaw cycles reveal weakened connections.
Summer (June-August): Good for DIY
For professional assistance with any home repair needs, contact Hey Fix It Pro at 639-739-0855 for a no-obligation assessment and quote.